


Before you ever launch a funnel or start figuring out how the tech will work, the first step you’ll want to take is actually mapping out the funnel.
There are a ton of different ways to build marketing funnels, and honestly, there’s no singular “right way” to build a funnel. What your funnel will look like will all depend on your goals, your audience, and the journey you want to take them on.
Related post: What is a Marketing Funnel?
Whenever I’m building a funnel for myself or a client, the first step is ALWAYS mapping out the funnel. As a visual learner, I’ve found this to be extremely helpful to not only get a more holistic view of what is happening but also think through all of the different steps, piece by piece.
Also, fun fact: I used to build process maps out as a Management Consultant back in the Corporate America days so I tooooootally geek out over this stuff! Especially now that I get to build funnels for programs and people I’m actually excited about 🙂
In this post, I’m going to walk you through my go-to tool for mapping out marketing funnels, Draw.io – and how you can get started using it yourself in just a few minutes!
Free Tool for Mapping Out Your Marketing Funnels
Draw.io is a tool by Google that allows you to build and design process maps and flowcharts.
While you can certainly use a good ole pen and paper or a whiteboard, I prefer to use Draw.io for a few reasons:
- It’s a totally free software included in Google’s suite of tools
- Pro tip: I highly recommend using Google Suite for your business email + documents if you don’t already! Very affordable and will make your life way easier and communication way more professional.
- You can easily access and edit your funnel maps from everywhere because your Draw.io documents save right to your Google Drive
- Because it’s on your Drive, it’s also incredibly easy to share with your team and anyone that may be helping you to build your funnels
Interested in learning more about our funnel building services? You can contact our team here!
While there are a ton of amazing features you can uncover in Draw.io, I like to keep it simple when building and teaching this tool. It just makes it easier for self-proclaimed “non-techy” entrepreneurs to get a really good grasp of how their funnel works and feel confident in taking it from idea to action.
So let’s dive into the 5 simple steps to start building your own funnels!
How to Use Draw.io to Build Your Funnels
Whenever you build a funnel, you always want to start with the end in mind. What is the goal that you’re leading them towards? What is your conversion?
Once you have this defined, you’ll then want to work backward to figure out the steps to take them from A to Z (or in marketing funnel terms, from Awareness to Consideration to Conversion).
If this is a little confusing to you, be sure to check out the blog all about marketing funnels.
If you’re ready to start mapping out your funnel, here are the 5 simple steps you can take to start building yours today.
1 – Create a Key for Your Process Map
Essentially you’re designing a process map right now. So it’s super helpful to create a “key” to refer back to, especially if you plan to share this funnel map with your team.
I usually create a tab on the spreadsheet titled “KEY” and then label each shape accordingly. I recommend sticking with the “general” icons and keeping your map as simple and easy to follow as possible.
Here’s an example of what my key would look like:

As you can see I create my first tab in the sheet to say “Key” so we can refer back to that with any questions.
We’ll be coming back to update this key later!
2 – Map Out All of Your Funnel Steps
Once you create your key, start a new tab on your sheet to start designing your funnel map. This is where the fun begins!
Start by adding a process icon to begin your process.
Pro tip: I keep all processes on separate tabs, so if someone starts another “process” I’ll add a process icon and start that new process on a new sheet. This helps me stay organized and not get overwhelmed. For example, if your funnel is a sales funnel for your course, and someone enrolls in the middle of the funnel, you’d want them to then start your “Enrolled Student Process” which would be shown on another tab.
Then you create your funnel by thinking through everything that needs to happen after each step. So if they opt into your webinar, what’s next? They’ll probably get a confirmation email. You may add a “tag” to your email service provider. You may send reminder emails.
So an example would look like this:
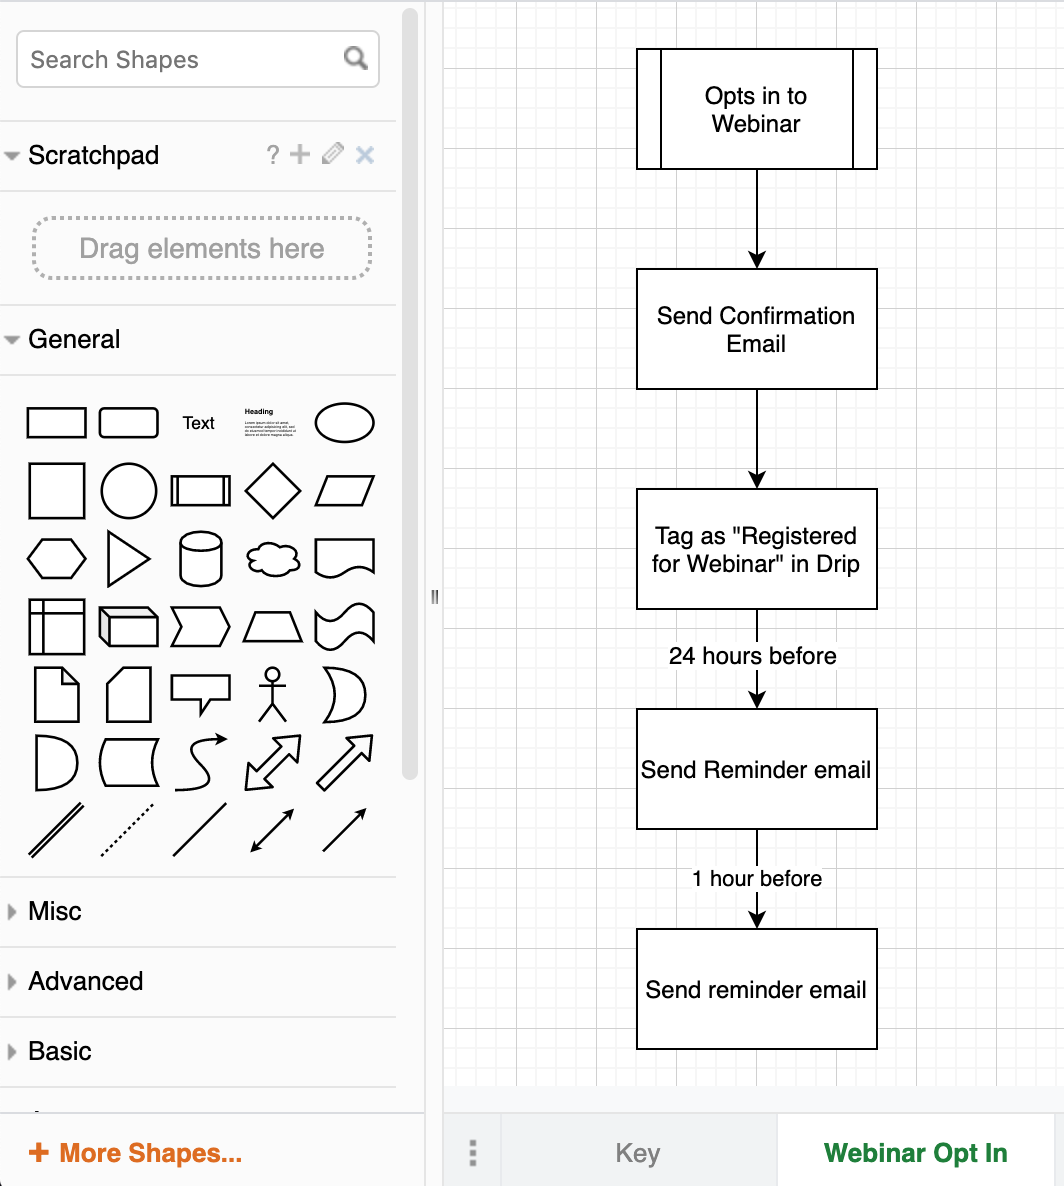
You can see the start of this process is someone opting into the webinar.
If something happens automatically or immediately, I just add a line from that step to the next. If there’s any kind of delay, I’ll note that on the line.
So what happens next? You may have a decision step asking if that person attended the webinar live or not. If they did, maybe you’ll send them a certain follow up with a replay link and a link to your offer. If they didn’t, maybe you only send a reminder to catch the replay.
The next few steps could look something like this:
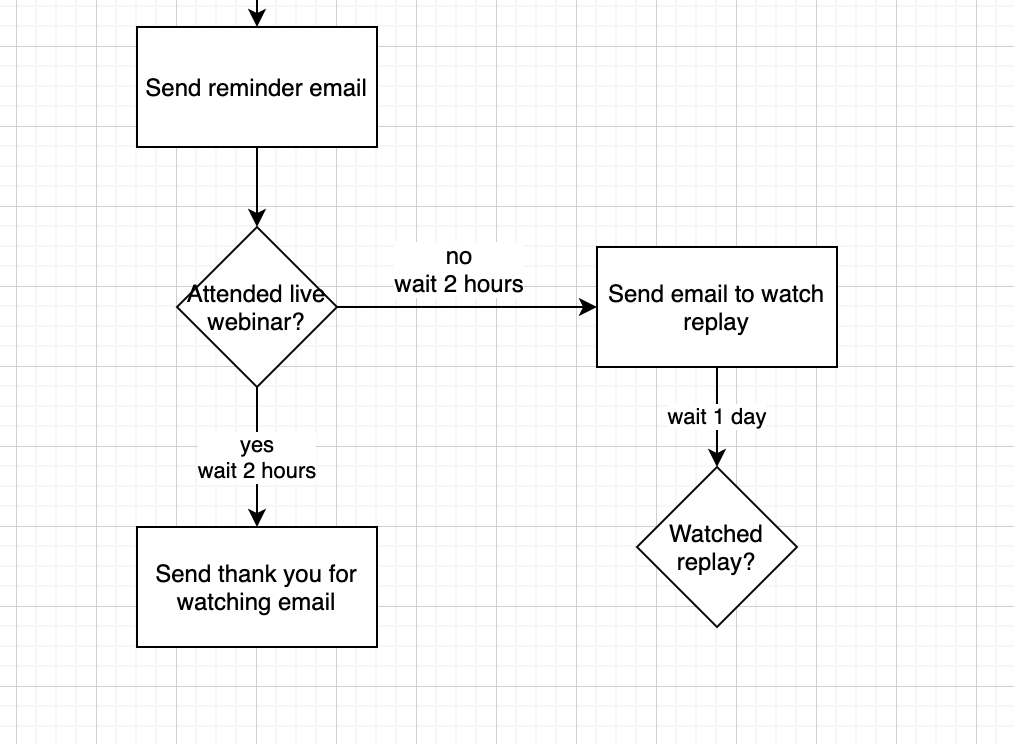
This is where your marketing strategy comes in. Remember: what journey do you want to lead them on? What is your goal? How do you want them to take action? Think through all of the “what ifs” and keep building step by step.
Continue this process until the end. What happens when someone reaches the goal? What if they don’t? How can you continue to nurture and serve them?
Related post: What is a Nurture Sequence?
Once you’ve mapped out all of the if/then possibilities and action steps, you’ve finished the first part of the funnel mapping process! WOOO!
So what’s next? How do you turn this map into an action plan?
3 – Decide on the Tech for Each Step
Once you have your funnel map, you need to figure out how you’re going to make the funnel work. What needs to take place for someone to get from one step to another?
This is where the tech comes in – it’s also where I see most people getting confused or overwhelmed. My suggestion is to just go step by step and ask yourself that question: what needs to happen for this to occur? Which tools do I need to use?
If you need suggestions or help choosing a tool, you can check out this post on our favorite funnel-building tools!
So let’s say for the first step someone opts into the webinar and you are going to send a confirmation email. Since we use WebinarJam, this would happen automatically within that software.
Pro tip: I love to color coordinate my steps to show which tools I’ll be using. So if “red” was something that happens in WebinarJam, my process would look like the following image since all of the confirmation and reminder emails will be sent through WebinarJam.
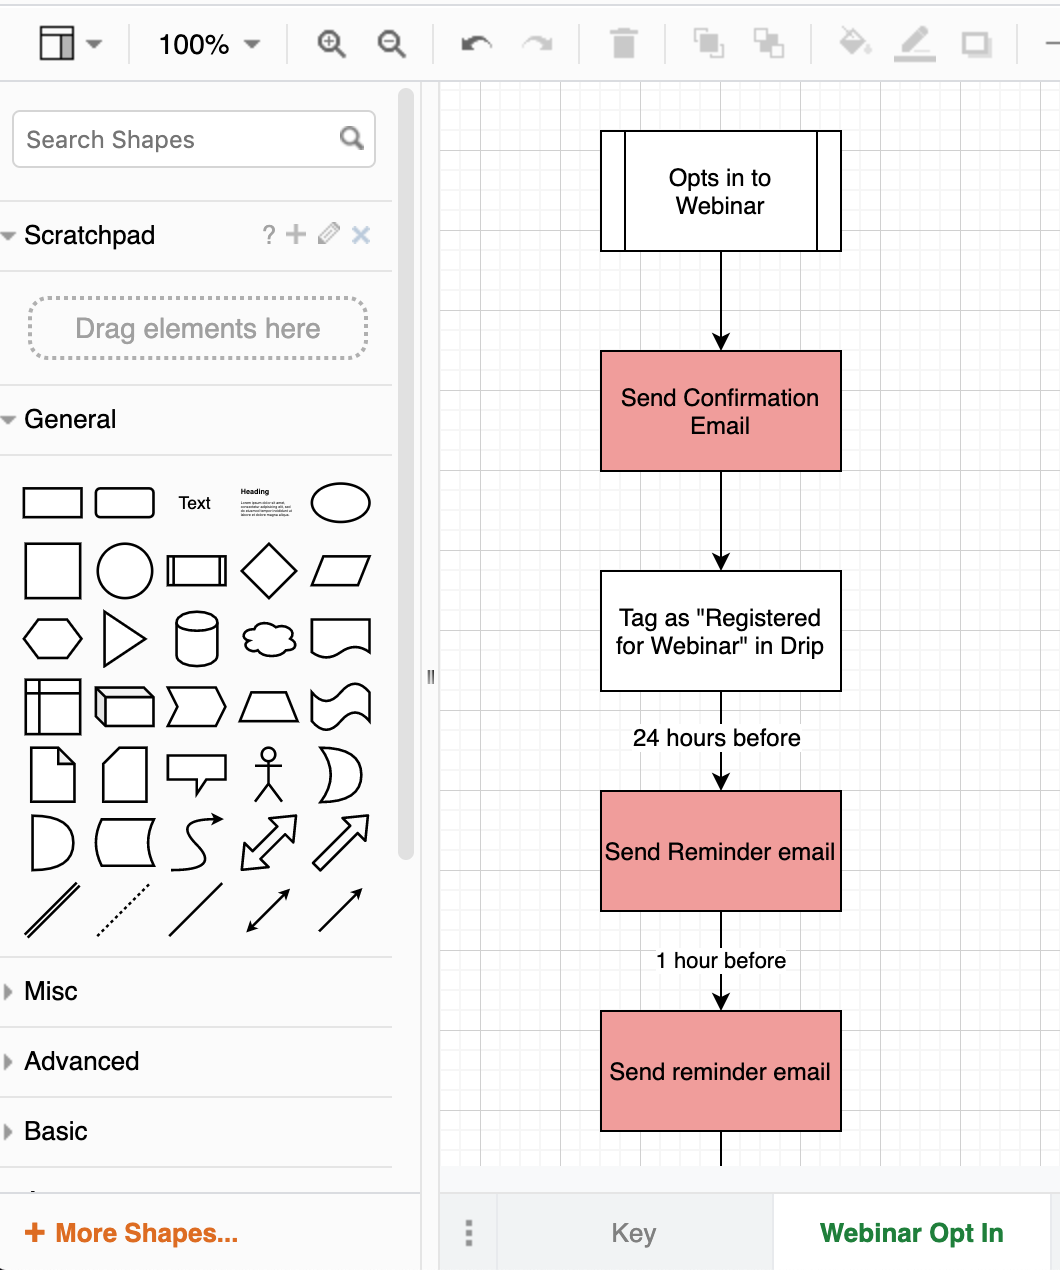
Be sure to update your key accordingly too! This way your team knows exactly what tools will make each step work.

4 – Create Your Implementation Plan
Continue to follow the steps above until you have your entire process and funnel mapped out.
Once you do, it’s time to create your plan to implement this funnel. Using your project management software, add in all of the steps you’ll need to create your funnel in a new funnel project.
Since we use Asana, I’ll show this funnel example in Asana. So if the first step is getting someone to opt into the webinar, that means we’re going to need to do the following:
- Build a webinar registration page
- Create the webinar on WebinarJam
- Add schedule times to WebinarJam
- Embed registration form on my registration page
And that’s just for the first step!
I’d continue this process for each step, adding the tasks and subtasks into Asana (or your project management tool of choice). I’d also add deadlines and assign tasks to the respective members of your team.
This is where it’s super important to keep in mind your timeframe and what needs to happen first. For example, you can’t host a live webinar if you don’t have the opt-in page and reminder emails set up first.

5 – Implement + Launch Your Funnel
YAY! Once you follow your game plan and check off all of the tasks on your implementation plan, it’s time to launch your funnel!
This is a BIG deal 🥳️(totally throwing confetti for you over here)
I’d LOVE to see the funnels you build and celebrate with you! Share them in the comments below or share and tag me on Instagram @jordanjones.co!
If you have any questions about these 5 steps, feel free to ask them below. If you’re interested in what it would look like to work with our team to map and build out your funnels, you can inquire to learn more here!
Happy funnel building 🙂
View comments
+ Leave a comment