


You’ve probably heard it a billion times before: the money is in your list.
In case you haven’t heard this before: the money is in your list.
Before you start to figure out *how* exactly you monetize your email list, you need to actually GROW an email list.
Meaning, let’s get more people on there than just our mom and college roommate 🙂
An opt-in is a great way to start building your list and serving your audience. There are a ton of different ways to create opt-ins, but in today’s post, we’re going to break down the 9 simple steps to creating your very first opt-in sequence!
1. Define your ideal audience
Before you ever actually do the fun creative part of the opt-in, there are a few steps you’ll need to take to make sure you’re creating the RIGHT resource for the RIGHT people – aka your people!
So in order to figure this out, you’ll want to make sure you dial in and figure out exactly who your ideal audience is. During this exercise, I recommend doing two things:
- Defining your broad audience
- Niching down into smaller segments
If you’re just starting, you’ll want to focus on creating one signature opt-in. This should be applicable to ALL of your ideal clients (even if they have some differences and can be broken into smaller groups).
For example, when we were first starting to teach Facebook ads, we started by sharing our “Facebook Ads Bible.” It wasn’t specific to the wedding industry, but our broad audience and our specific niche would both find it useful. Once we decided to narrow in on the wedding industry, our opt-in looked more like “The 3 Factors You Need to Book More Brides.”
So if this is your first opt-in, try to start a little broader with your audience. This isn’t to say you shouldn’t have a well-defined audience or niche. Think hard on this!
Everyone needs marketing. The strategies I teach would honestly help any person that’s growing a business. But by speaking specifically to Christian entrepreneurs who want to grow impactful + income-driving businesses without sacrificing what matters most, I’m able to attract my ideal audience MUCH easier and serve them MUCH better.
So step one is simply to define who you’ll be creating this opt-in for!
2. Figure out what your audience needs help with
Here’s the thing: this opt-in isn’t about you – it’s about your audience. It’s not really even about everything you can teach (because I’m sure you have a LOT to offer).
It’s about figuring out a problem your audience has that you can help with.
✨PRO TIP: most of the time, the problem YOU think they have isn’t the problem THEY think they have.
As an example, for our Facebook ads opt-ins, the problem wasn’t that our audience wanted to learn Facebook ads. Honestly, most of them were a little overwhelmed by the thought.
Their problem was that they weren’t getting booked out and they couldn’t just rely on referrals to bring in enough leads. They were tired of living in the feast or famine cycle for their business, and they needed a way to get more of the right leads and really be in control of their own pipeline. We spoke to THOSE problems… and then offered Facebook ads as a solution (see step 3 below).
3. Identify how you can help solve that problem
Based on the problem you identify for your audience, you next need to figure out how you can provide a unique solution to their problem.
Note: this isn’t the actual opt-in idea yet – this is the concept of the solution you provide.
Our solution was helping people learn Facebook ads (the “how” of the opt-in wasn’t decided in this step yet).
Let’s do another example. Laura’s audience feels burnt out and overwhelmed. They are dropping the ball with their communication and feel like their client experience is suffering because of it. Laura’s solution is to teach workflows and systems to help her audience confidently serve her inquiries and clients without burning themselves out.
HOW she does that is what we’ll figure out next…
4. Determine which type of opt-in is right for you
Woooo! You’re almost halfway there! Now that you’ve identified your audience, their problem, and your solution, it’s time to figure out how you’re going to help them.
In this step, you’ll want to determine which type of opt-in is right for you. There are a TON of different types of opt-ins, such as:
- Ebook
- Checklist
- Swipe Examples
- Email Challenge
- Video Series
- Quiz
- Webinars
- Masterclass
Which option will best help you solve their problem? To be fair, a few of these may work for you! But to get started, you’ll want to pick just one. If possible, I recommend trying to start simple with a checklist or ebook.
5. Create that amazing opt-in (Canva, Adobe, etc)
Now it’s time for the fun stuff – creating your new, amazing opt-in!
Personally, I love using Canva for creating all of our opt-ins and graphics. There’s a free version of the app, but we pay for the premium version to get access to some extra features like branding, easy resizing, and special elements and photos.
*You can get one free Canva credit with my referral link here!*
Canva seems to be the most affordable (usually free), easiest, and most popular option for designing opt-ins. They also have a ton of killer templates to start with.
That being said, if you’re more of a techy creative pro, you could totally use any of the Adobe Suite like Photoshop or In Design. We have the full Adobe Creative Suite and I still design all of my opt-ins in Canva.
6. Create a form for your opt-in
After you’ve created your brand-spanking-new opt-in, you’ll need to set up how you’re going to deliver it to the folks who want it!
In this step, you’ll need to create a form in whatever email service provider (ESP) you use for your business. If you’re just getting started, Flodesk is an amazing, easy-to-use, affordable option.
Pro tip: you can save 50% off your Flodesk subscription* with my referral link.
It doesn’t matter which type of ESP you use for this step, just go ahead and create a new form for your opt-in.
SUPER TECHY OPTION:
I only share this option because this is what I do a lot of times, even with using Flodesk. I’ll create either a landing page or a pop up in Leadpages, and then I’ll link to that form whenever I share the opt-in (either with text or a graphic). Then I have my Leadpages form directly integrated® with my email list so that the person is added to the right sequence to receive the opt-in.
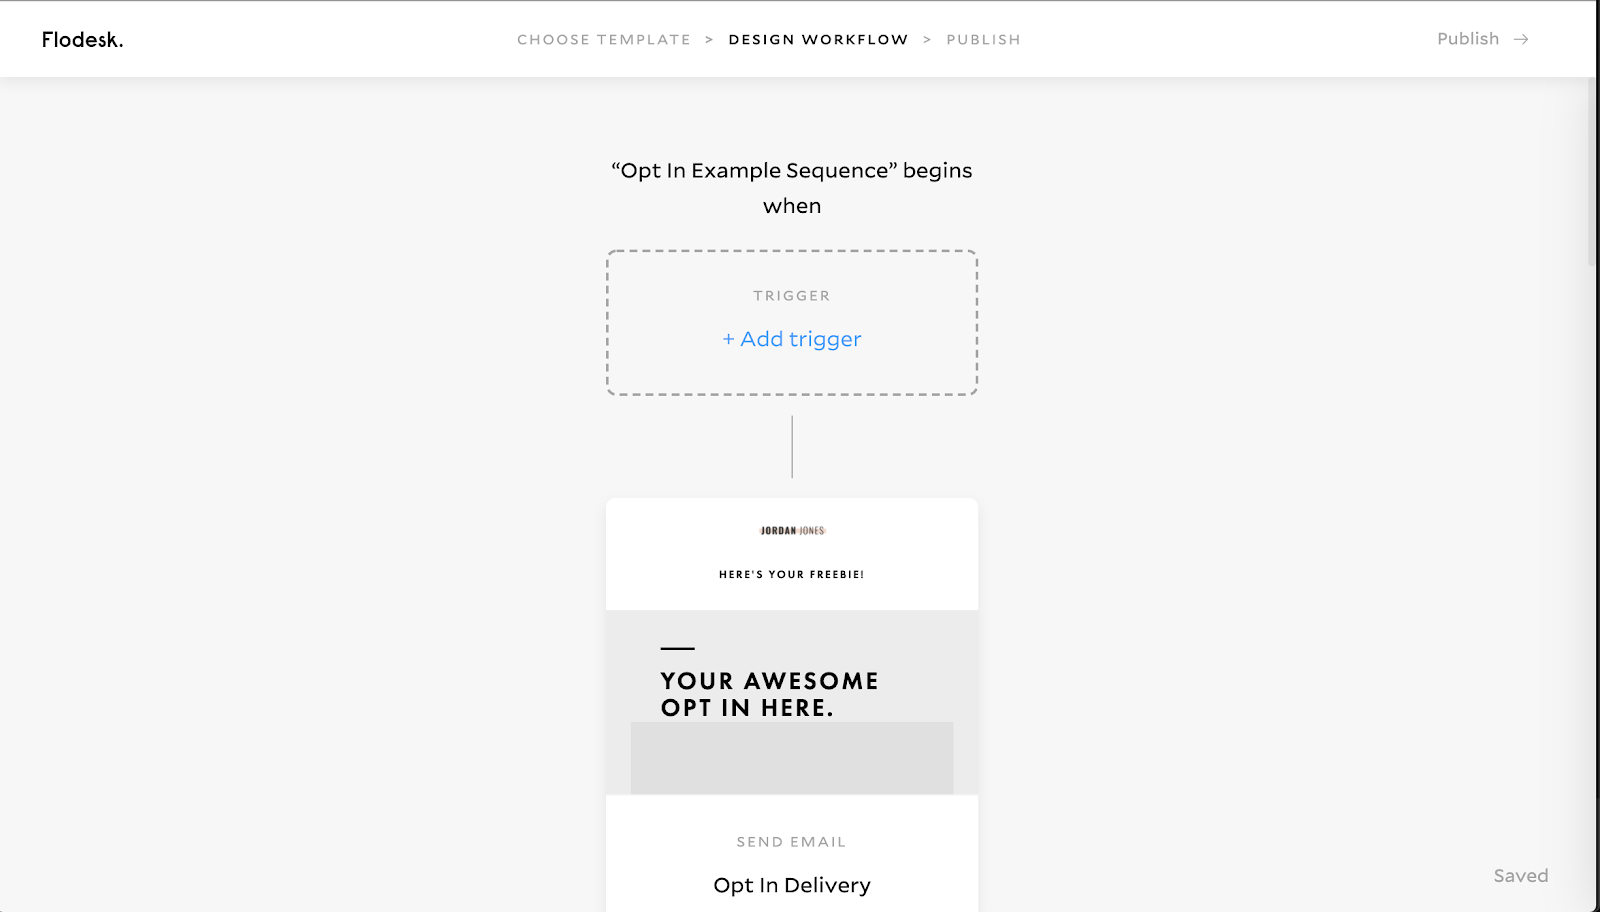
7. Create an opt-in sequence (link to nurture sequence post)
After someone opts-in to your form, you want to make sure they then begin a delivery and nurture sequence. These can technically be the same things if you want them to, but to keep it simple, I’ll keep them separate as I explain.
So once someone submits a form for your opt-in, you need to make sure your email platform enters them into the right segment or sequence to receive the opt-in. At the minimum, this email sequence should have one email that delivers immediately and sends them the opt-in they requested.
From there, you could also trigger another sequence to then nurture that lead and potentially lead them into a sale or booking a discovery call.
Related post: What is a Nurture Sequence?
To do this in Flodesk, you’d create a Form and have that form put people in a new segment (EX: “Title of Opt-in”). You’d then create a Workflow with a trigger of someone being added to that new segment. Then, you would add an email to send them the opt-in they requested.
Bonus points: you can then add a step to enter them into another nurture sequence you have set up in Flodesk or send some more emails spread out over a few days to provide additional resources and foster engagement (aka a mix of a delivery + nurture sequence!)
8. Embed your opt-in form on your website (or use a pop up)
YAY! You have all of the techy backend set up, so now it’s time to get that bad boy on your website! You’re ALMOST THERE friend 🙂
In this step, you’ll need to grab the code for your opt-in form and embed it on your website. If your form is a full-page form like one that Flodesk offers, you could simply copy the URL and link to that wherever you want to share the opt-in!
Here are a few ideas for places to include your new opt-in:
- The top/notification bar of your website
- On your homepage
- In a blog post
- In your welcome email or nurture sequence
- In your Facebook group
- In your Instagram bio
9. Grow your email list, rinse, and repeat!
That’s it, folks! Now it’s time to get your amazing new freebie in the hands of the people who need it. Now is the time to share your opt-in and start growing your email list!
After you’ve done this once, it’s an easy rinse-and-repeat process to create more opt-ins and build your list even bigger, faster. The opportunities are endless!
Now I’d love to know: what opt-in are you going to create? I’d love to cheer you on or answer any questions you may have. Share your idea or link up to it below! 👇
*Disclaimer: This post includes affiliate links and I would love it if you decided to use them. Affiliate links + referrals programs help educators like me to fund the free content that we provide on our blogs at no additional cost to you.

View comments
+ Leave a comment