


If you’re growing a business, you need to build an email list. And if you have an email list, you need to actually show up and serve that list – which is why nurture sequences are so so important!
What’s crazy is I see SO many entrepreneurs and businesses neglect this marketing strategy – leaving a TON on the table in terms of building trust, engaging with your audience, serving them well, and let’s be honest – income opportunities.
But I know that’s not you, friend. You’re here because you’re ready to build your own nurture sequence! (And I’m REALLY stinking excited about that!)
So let’s dive into the nitty-gritty of how to build out a nurture sequence of your very own.
Related post: What is a Nurture Sequence?
Choosing Your Email Provider
Before you start building your first nurture sequence, you’ll need to choose your email service provider (ESP).
There are a ton of options out there – from Flodesk to Drip to ActiveCampaign to Mailchimp to Convertkit (and on and on and on).
The best tool for you will depend on your goals, budget, and list size. If you have a specific question, feel free to drop it in the comments below. But honestly, I find Flodesk to be a really great option for most creative entrepreneurs these days for a few reasons:
- Flodesk is super intuitive and easy to use
- Flodesk looks SO good (a really great option for anyone who is very visual in their brand/offering/service)
- Flodesk is crazy affordable – especially because it charges one price no matter the amount of subscribers (ex: Drip charges us $200+ and Flodesk charges us $19 for the SAME amount of subscribers)
✨Pro tip: You can make Flodesk even more affordable by saving 50% with our referral link!
For the sake of simplicity, and because it works for SO many of our students’ + clients’ needs, I’m going to walk you through the step-by-step instructions for how to build your own nurture campaign in Flodesk.
Building a Nurture Campaign in Flodesk
Once you’ve created your Flodesk account (or signed up for the trial), you’ll want to navigate to the Workflows section at the top then click the black “+ Create new” button on the top right.

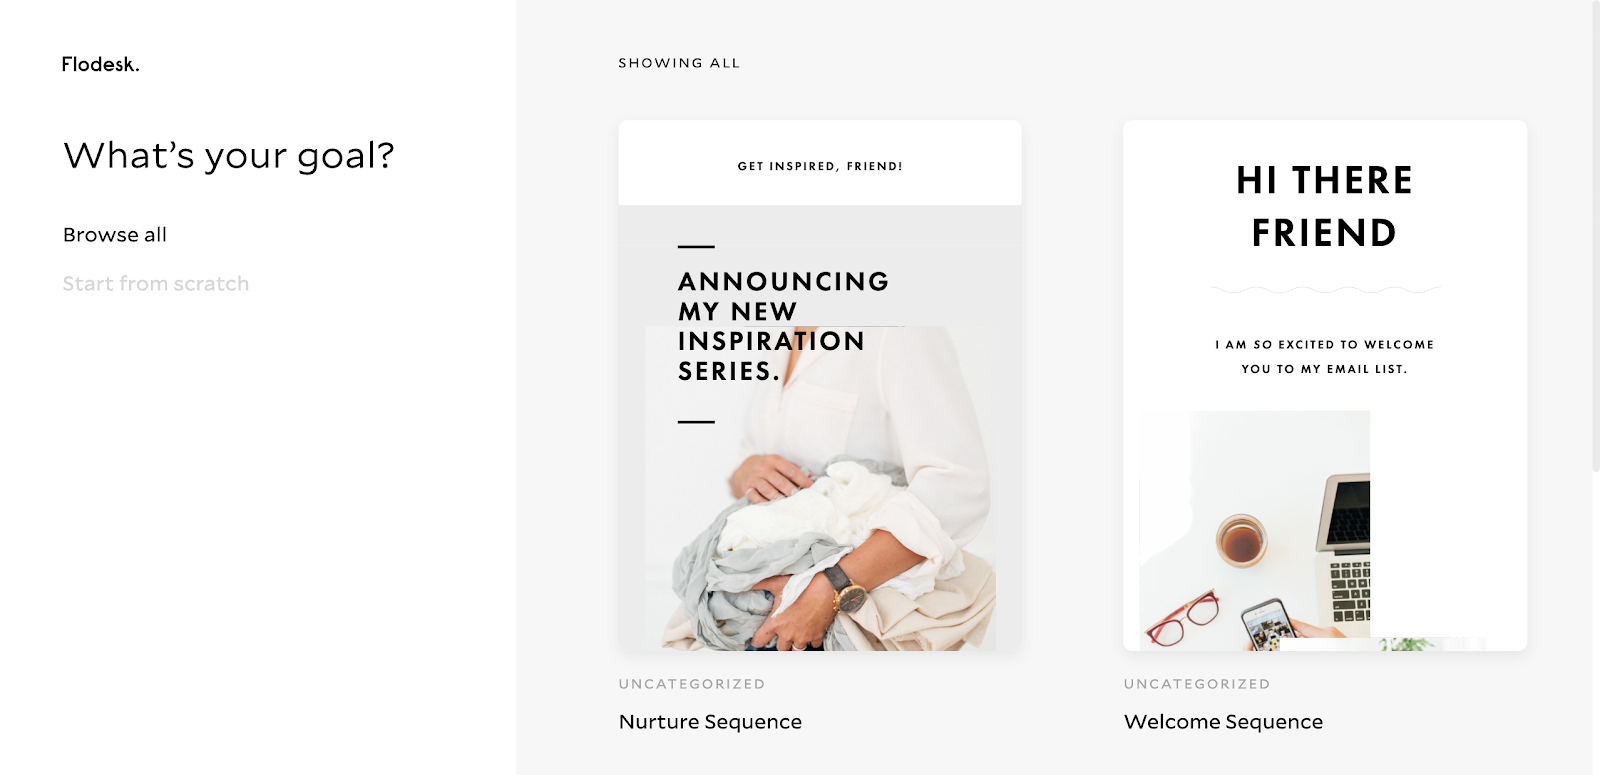
One thing I LOVE about Flodesk is that they have some amazing templates for you to choose from (even one that’s straight-up called “nurture sequence”). You can also choose the start from scratch option.
Click “View Details” to preview the template before using it.
If you find a template you love, feel free to customize that and make edits as necessary! *be sure to check out my tips below for things to keep in mind!
Creating a Custom Workflow in Flodesk
For the sake of this example, I’m actually going to walk you through how to create one from scratch so that you have the power and flexibility to create a workflow that makes the most sense for your business and audience. We’re going to be talking more strategy than tech, but here are the first few steps in Flodesk.
To start, go ahead and click the Start from Scratch open and name your workflow in the next pop up.

To start building your workflow, you’ll need to choose a Trigger. This is the event that will start your workflow. In Flodesk, you currently can only trigger a workflow based on someone starting a segment.
Click + Add Trigger then in the drop-down menu select which segment you’d like to trigger the workflow.
My advice is to create segments for each opt-in and the audience you have. So for example, if someone gets a certain result from my quiz, they will be tagged as a certain segment and then that will trigger the corresponding workflow.
This way, my audience is segmenting into the right “result” and will receive a nurture sequence catered to their quiz result – which will help me serve them better by sharing the most relevant and valuable information for the stage of business they’re at!
So for you, let’s think about what opt-in you want to trigger this workflow. What will they have downloaded or opted into – name that segment and have it trigger this workflow!
Once you select the segment, you’ll be able to choose the “+” button under the trigger to add your first step to the workflow.
In Flodesk, you’ll have 4 options:
- Email – send an email to the segment
- Time Delay – set a delay before continuing to the next step
- Condition – take an action based on a condition, like whether they’ve opened an email or clicked a link
- Action – adding or removing someone from a segment

If your trigger was based on someone opting into a sequence, then the first step of the workflow should be delivering whatever they’ve opted into (or confirming it).
So go ahead and click Email – then create a kick-butt email sharing the download they’ve opted into!
Once you’ve fulfilled the expectations of their opt-in, it’s time to nurture. This is where the fun comes in!
Why Build a Nurture Sequence?
The point of a nurture sequence is simple: to nurture your lead and build the like, know, and trust factors.
But there’s a goal here right? What do you want them to eventually do?
This is one of the first decisions you need to make when building a nurture sequence: what do you want to nurture them for? What action are you nurturing them to take?
Once you determine what this is, then we can work backward to figure out what actions we need to take, which kinds of emails we need to send, and how often and how many emails to send.
Let’s say for example you eventually want someone to buy a shop product. Your nurture sequence may provide valuable information related to that product and priming them to be interested in the sale. Perhaps you’ll share some pain points that this product would be a solution for. Maybe you’ll share a testimonial or a case study. Maybe you’ll share a personal story – kind of like a “where I was before” – and then your product is what gave you the transformation you want to help them get.
Note: you’re not going to be selling in all of these emails. The point is to NURTURE so that when you eventually share an offer in the future, they’re ready, willing, and excited to buy.
Once you determine what the future goal is, you can then work backward to determine the best way to build trust and nurture that lead.
Tips to Keep in Mind
When building your nurture sequence, there are a few things you’ll want to keep in mind, no matter which ESP you’re using.
1. Segment your list
Yes, this is a workflow to one segment of your list. But if your goal is to lead someone into a future sale, and they’ve already purchased that offer, then you don’t want to re-invite them to purchase again right?
Use the Action option in Flodesk to filter out anyone who may be in a “purchased” segment. (They’ll have their own nurture sequence for post-purchase!)
2. Create connection + engagement
Build the like, know, and trust factors through authentic connection. Ask questions and get them to reply to your emails. Talk to their pain points. Share personal stories. Highlight students to show you care and are here to help.
I love this example from the Flodesk templates:

It’s called “A personal, vulnerable story” and it’s in the Welcome Sequence template.
3. Establish yourself as a leader
Your nurture sequence is your opportunity to tell your new friends WHY they should trust you and learn from you. This is the time to let your expertise shine!
I’m a big believer in providing great content for free. I’m certainly not telling you to spill all of the beans – because your knowledge and expertise deserve to be paid for – BUT you can still serve people well and provide good content for free (without baring it all).
4. Lead them where you want them to go
Hopefully, this goes without saying now, but the whole point of a nurture sequence is leading them to take an eventual action – one that you are priming them for.

Make sure that there is a direction for your nurture campaign and that there’s a clear way for them to take the action you’re leading them towards. How will you invite them to take action? A few examples are:
- inviting to join a webinar
- inviting to join a Facebook education group
- Sharing code for a special discount to take action and buy a shop product
- Inviting to book a discovery call
There are a ton of ways this can all work out, but hopefully, these ideas will give you a good foundation to get started 🙂
Now I’d love to know: how are you going to nurture your leads? Let me know in the comments below! 👇
*Disclaimer: This post includes affiliate links and I would love it if you decided to use them. Affiliate links + referrals programs help educators like me to fund the free content that we provide on our blogs at no additional cost to you.

View comments
+ Leave a comment